M-910.02.950 [2024-02] Basic equipment in a brewery microbiology lab – Microscopes
Application/Purpose
The method lists the equipment that is important in a brewery microbiology laboratory.
Scope of Application
Microbiology laboratories in the brewing and beverage industry and their suppliers.
Principle
Light microscope (bright field/dark field/phase contrast)
The light microscope plays a central role in the analysis of microbiological samples. Figure 1 gives an example of an optical microscope. The annotations are intended to briefly explain the most important structural components and mode of operation. The aim is to provide the necessary information to enable a company to assess whether the microscope used is suitable in principle or to ensure that important hardware is correctly configured in the event of a new purchase. No information is provided here on the correct adjustment and commissioning (e.g. Köhler illumination). More detailed information on this can be found in Reference 1 (p. 203-233).
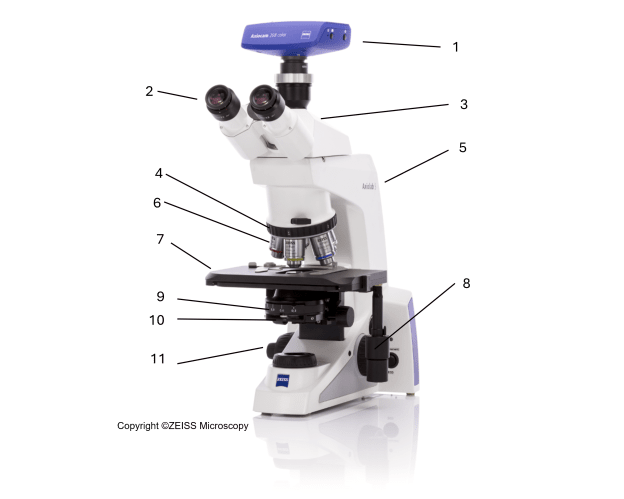
| Fig. 1: Structure and components of an optical microscope | |
| 1 | Digital camera |
| 2 | Eyepiece / ocular lenses |
| 3 | Binocular tube |
| 4 | Objective turret |
| 5 | Arm |
| 6 | Objective lenses |
| 7 | Stage (cross table) |
| 8 | Coaxial drive to move specimen |
| 9 | Aperture diaphragm rotator |
| 10 | Condenser |
| 11 | Coaxial drive to move specimen |
Design and function of an optical microscope [2, 3, 4, 5]
The light microscope consists of two different optical systems that magnify the objects to be examined in two stages:
Objective: produces a magnified, laterally inverted projection image of the objects to be observed, referred to as the intermediate image
Eyepiece: a magnifying glass that is used to enlarge the intermediate image to the final image
The total magnification is therefore the product of the eyepiece and objective magnification. The quality of the objectives is critical to the performance of a microscope. The structures that the objective does not show in the intermediate image cannot be magnified, even with high-quality eyepieces.
An important parameter, besides the total magnification, is the resolving power of a microscope. The resolving power is determined by the numerical aperture of the objective. In simple terms, the objective's resolving power depends on how much light enters the objective from a structure of the specimen. This amount of light is, in turn, dependent on the aperture angle of the corresponding objective. The larger the aperture angle, the better a lens resolves the details of a specimen. However, it is the numerical aperture (= objective aperture), not the aperture angle, that is indicated on the objective. How well a lens resolves details depends not only on the aperture angle but also on the refractive index of the medium between the cover glass and the lens. The higher the numerical aperture, the greater the resolving power of a lens (Fig. 2). If there is air between the lens and the cover glass (refractive index approx. 1.0), the resolving power is only calculated according to the sine of half the aperture angle. The highest achieveable value of the numerical aperture in theory would be exactly 1.0. However, this would require an objective with an infinitely large front lens and a working distance close to zero (= distance between objective and specimen). For obvious reasons, such an objective cannot exist. The numerical aperture that can be achieved in practice is therefore a maximum of 0.95.
The numerical aperture A is calculated as follows:
A = n × sin σ
n: Refractive index of the medium between the cover glass and the front lens of the objective (the refractive index is approx. 1 for air)
σ: Half the aperture angle of the lens

Fig. 2: Relationship between aperture angle and resolving power
Source: http://www.mikroskopie.de/kurse/apertur.htm (accessed on 17.11.2024)
Simplified diagram of the aperture angle
Left: Objective with large aperture angle and therefore high resolution
Right: Objective with small aperture angle and therefore low resolution
An increase in resolution could be achieved by using special objective lenses that are suitable for the use of immersion oil. With these immersion lenses, an immersion oil with a higher refractive index is applied between the cover glass and the lens. This means that even more strongly inclined light rays still reach the lens. In this case, the lens is immersed in the drop of immersion oil. The lenses must be cleaned after use.
As the resolving power depends on the "amount of light" absorbed by the lens, the resolving power of the lens naturally increases with the numerical aperture. Oil immersion lenses can achieve numerical apertures of up to around 1.40. Higher numerical apertures cannot be achieved with conventional light microscopes. The ability of an objective to resolve two neighbouring details in the specimen depends on its numerical aperture.
The following formula is used to calculate the theoretically possible resolving power of a lens from the numerical aperture:
d = λ/2 × A
d: minimum distance between two points that can still be recognised
λ: wavelength of the light
A: numerical aperture (n. A.)
The human eye can distinguish details that are about 0.2 to 0.3 mm apart without any additional aids. These values also determine the useful magnification that can be achieved with light microscopes. When using an immersion objective with a high numerical aperture, this maximum magnification, just like the resolving power, is around a factor of 1000, which is why even very expensive microscopes generally do not exceed a total magnification of 1000x.
In principle, it is possible to achieve a certain total microscopic magnification using different combinations of objective and eyepiece. For example, if you combine a 40x objective (n.a. 0.65) and a 25x eyepiece, you will achieve the same total magnification as with the combination of a 100x objective (n.a. 1.25) and a 10x eyepiece. Nevertheless, the microscopic image of both combinations will differ considerably. The numerical aperture of an objective determines its resolving power. The eyepiece can only enlarge the image produced by the objective. Details that are no longer resolved by the objective cannot be added by an eyepiece, no matter how high the magnification. As a rule, the total magnification of objective and eyepiece should not exceed 500 to 1000 times the numerical aperture of the objective used (useful magnification). A 40x objective (n. A. 0.65) in the above combination with a 25x eyepiece provides a thousand-fold magnification, but the image appears "optically empty" as the useful magnification is clearly exceeded.
The following therefore applies to the total useful magnification: useful magnification < A × 1000
The above explanations summarise the following points for use in breweries:
In most cases, dry objectives without oil immersion are recommended for everyday laboratory use. Dry objectives are easier to handle as they do not need to be cleaned.
It should be possible to achieve maximum magnifications of 640x to approx. 800x with dry objectives.
The combination of eyepiece and objective should be smaller than A × 1000.
Lenses with a high aperture provide a high resolution, but the contrast is lower; the reverse is true for lenses with a low aperture.
The values for the eyepiece and objective magnifications are noted on the components. In addition, the numerical aperture is labelled on the objectives next to the objective magnification. For a 10 mm lens, a typical labelling would be: 10/0.25 (10 = magnification, 0.25 = numerical aperture).
Illumination types (bright field/dark field/phase contrast)
By selecting different condensers or by inserting diaphragms into the path of a beam, different display forms (e.g. phase contrast or dark field) can be realised. These diaphragms can be inserted into the condenser using a slider or insertion diaphragms. The most convenient way for the user is to insert the diaphragms using a ring diaphragm turret (see Fig. 1), as all available diaphragms are usually integrated and the appropriate diaphragm can be selected very easily.
Bright-field microscopy:
Bright-field microscopy is the simplest and most basic method using the light microscope. The specimen is illuminated from below by a cone of light. If there is no object in the beam path, the light rays enter the objective unimpeded to obtain a uniformly bright image.
The light path in bright-field microscopy typically looks like this (Fig. 3):

Fig. 3: Light beam path for bright-field microscopy
The objects to be observed (e.g. yeasts and bacteria) are relatively low in contrast, which means that the outline and cell contents of the specimens are difficult to detect. Specimens without staining can therefore only be analysed to a limited extent.
However, bright-field microscopy can be combined well with staining methods. For example, methylene blue is used as a dye to detect live/dead yeast cells, as stained cells stand out well against a light background.
Phase-contrast microscopy:
The phase-contrast method is an imaging technique in light microscopy that enables the direct imaging of structures that have a low inherent contrast and would only be clearly visible with synthetic dye in bright-field microscopy. The physical background of the method will not be discussed here. The advantage of the method is that, in contrast to bright-field microscopy, high-contrast images can be produced without the need for staining.
A special application of phase-contrast microscopy in brewing is to differentiate between living and dead yeast cells: Dead yeast cells appear darker in the microscopic image than live cells.
Dark-field microscopy:
Dark-field microscopy is a highly suitable method for differentiating and identifying microorganisms that are relevant to brewing. It produces a dark image background against which the structures to be observed stand out brightly. This allows high-resolution, high-contrast images to be generated of transparent, low-contrast specimens without the need for prior staining. The entire morphology, i.e. cell shape, cell contents (e.g. lipid granules) and the mobility of objects can be easily observed.
The principle of dark-field microscopy is based on the fact that the objects not only absorb light, but they also always deflect part of the light beam. The central rays of light are blocked out by a central diaphragm (1). This means that only the light rays hitting the edge of the condenser (2) are deflected. The rays intersect in the object plane and pass the lens if there is no deflection. The viewer therefore sees a dark image. As soon as particles are introduced at the object level, they scatter the light, the scattered light enters the lens and can be observed (Fig. 4).

Fig. 4: Light beam path in dark-field microscopy
1. Central aperture
2. Condenser lens
3. Hollow cone of light
4. Specimen level
5. Scattered light that reaches the objective lens
6. Objective lens
The more strongly the objects scatter the light, the more intensely luminous these objects appear when viewed in the dark field. In many cases, this property allows conclusions to be drawn about the organism under observation. For example, endospores are highly refractive and therefore appear in the dark field as objects with an intensely luminous outer shell. Microorganisms with a thick cell wall, e.g. yeasts or lactobacilli, as representatives of gram-positive bacteria, generally also appear highly refractive.
Microorganisms with a thin cell wall, e.g. E. coli or pseudomonads as examples of gram-negative bacteria, often appear less refractive.